1. Get a IZOKEE CP2102 Module USB to TTL 5PIN Serial USB to TTL device.

2. Solder pins to the TTL/UART connectors on the C64 mini.
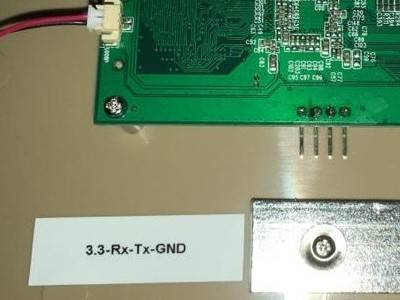
3. Connect your serial tty device to your computer and to the c64 mini. (C64 mini should be off)
- usb-tty-converter GND to the c64 mini GND
- usb-tty-converter RX to the c64 mini TX
- usb-tty-converter TX to the c64 mini RX
- Do not connect the 3.3v
4. Get Putty https://www.putty.org/
The following configuration should work for all converters, this will allow us to connect to the device.

5. Connect to the ttl-usb-converter, and then turn power on for the C64, hold the s key on your keyboard in putty, this should suspend the boot and put us in the uboot boot loader.
6. So at this point, we can modify our boot process to boot into a Linux kernel that has wifi support and any other features that you desire. In order to create a custom kernel for this device we need a kernel that supports the ARM a20 allwinner architecture found in the c64 mini. Linux-sunxi was the chosen project, their goal was to make a kernel that supported a vast array of the Allwinner ARM processors, including the A20.
- Get a working a20 allwinner kernel:
- git clone https://github.com/tpolasek/linux-sunxi --depth 1
- My repo has a pre-configured config file and some patches to make things work -- its not the best quality but it works :)
- Get a Linario GCC-ARM Cross Compiler
- Get a roof-fs from here: http://s3.armhf.com/dist/bone/ubuntu-trusty-14.04-rootfs-3.14.4.1-bone-armhf.com.tar.xz
- Create a USB drive with ext3 partition, extract the rootfs to the paritition
- Extract Linario....tar.xz to ~/linario
- Add to PATH: ~/linaro/bin
- Go to your kernel clone
- Run builduimage.sh
- sudo cp arch/arm/boot/uImage $USB_DRIVE_ROOT/uImage
- cp -Rp output/lib/modules/3.4.104* $USB_DRIVE_ROOT/lib/modules/
7. Plug the usb into the C64.
8.Lets install our new kernel: Boot into the kernel ramfs by running the following command, this allows us to manipulate the NAND flash:
- setenv bootargs console=ttyS0,115200 ramfs init=/init loglevel=8 mem=256M rootwait; sunxi_flash read 40007800 boot; boota 40007800
- insmod /lib/modules/3.4.39/nand.ko # loads our NAND drivers
- mkdir /tmpusb
- mount /dev/sda1 /tmpusb #mount our usb to /tmpusb
- dd if=/tmpusb/uImage of=/dev/nandb # Install our new kernel on NANDB
- Run 'sync'
9.Lets boot into our new kernel and rootfs:
- Turn off the device
- Open putty, keep pressing the 's' key, and plug in the power to the C64
- Once in the bootloader
- Run the following command to boot our new kernel and rootfs
- setenv bootargs console=ttyS0,115200 init=/init root=/dev/sda1 loglevel=8 mem=256M disp.screen0_output_mode=1280x720p60 rootwait; sunxi_flash read 40007800 rootfs 1000000; bootm 40007800
- Your boot process will probably need to be manually interrupted by pressing M
- There are some init scripts that need to be modified
- /etc/fstab needs to be modified to reflect your usb drive layout for root
- SUCCESS - you have your own kernel booting with a custom rootfs running Ubuntu.
- I use the RTL8192CU usb wifi device, get one if you want internet (you must use a powered hub -- the stock C64 usb port doesnt have enough power)

